This is not a copy‑paste documentation blog. This guide comes from real incidents, real mistakes, and real recoveries in production.
To be honest, most teams start thinking seriously about Kubernetes Disaster Recovery only after something bad has already happened. I was no different. For a long time, I believed that High Availability was enough. Then a few incidents proved me wrong.
The goal of this blog is very simple 👇
👉 If your production cluster goes down tomorrow, you should be able to restore it calmly — without panic.
🧠 Why Kubernetes Disaster Recovery Is Still Ignored
Most Kubernetes setups stop here:
- Pods restart automatically ✅
- Nodes recover or get replaced ✅
- Load balancer looks healthy ✅
And then we assume everything is safe.
Reality is a bit harsh 👇
- Someone runs a wrong command (
kubectl delete ns prod) - etcd gets corrupted silently
- A cloud region has a major outage
That’s when it becomes clear:
👉 High Availability and Disaster Recovery are two very different things.
In this blog, we are not just talking about concepts. We are walking through an actual recovery process, step by step.
Kubernetes DR Levels (In Simple Terms)
Not all failures are the same. Thinking in DR levels makes things clearer:
| Level | What it means | Real example |
|---|---|---|
| L1 | Pod-level issue | Pod crashes and restarts |
| L2 | Node-level issue | Node fails, new one joins |
| L3 | Cluster-level issue | Cluster deleted or corrupted |
| 🔥 L4 | Region-level issue | Entire cloud region down |
👉 This guide focuses on L3 and L4, where most teams struggle.
🏗️ Multi-Cluster DR Architecture (How It Works in Practice)

The idea is simple:
- One primary cluster where production runs
- One secondary cluster kept ready for disasters
- Shared object storage where backups are stored
🛠️ Tools Used (Only What’s Actually Needed)
| Tool | Why it’s used |
|---|---|
| Velero | Backup and restore Kubernetes resources |
| CSI Snapshots | Persistent volume data backups |
| Object Storage | Central backup location |
| kubeconfig | Switching between clusters |
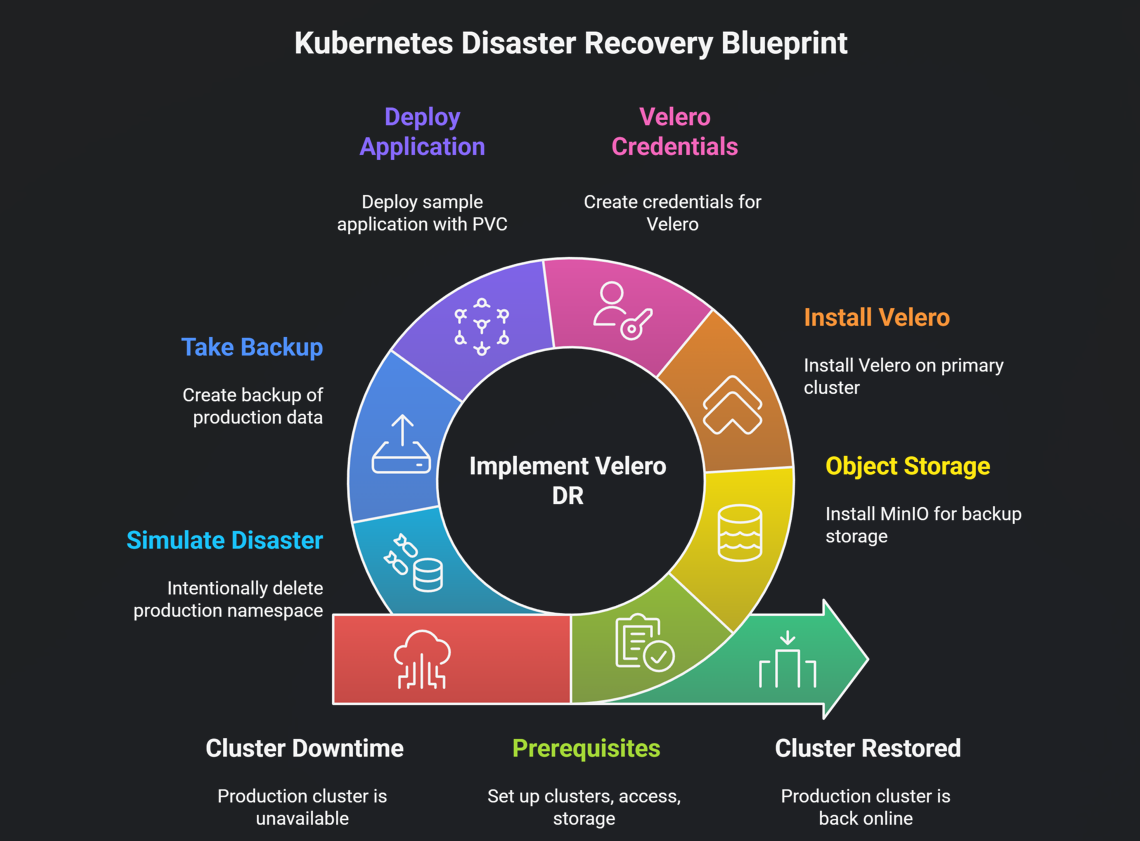
Step 1: Prerequisites
✔️ Kubernetes Clusters
You need two clusters:
cluster-a→ Primarycluster-b→ Disaster Recovery
✔️ Access Check
kubectl config get-contexts
If both contexts are visible, you’re good to proceed.
✔️ Object Storage
You can use any of the following:
- AWS S3
- GCP GCS
- Azure Blob
- MinIO (best for demos and labs)
Step 2: Object Storage Setup (MinIO Example)
kubectl create ns minio

helm repo add minio https://charts.min.io/
helm install minio minio/minio \
  -n minio \
  --set accessKey=minio \
  --set secretKey=minio123
Create a bucket:
mc mb minio/k8s-backups
Step 3: Install Velero on the Primary Cluster
One common mistake here is blindly following docs without verifying versions. The commands below are tested and stable.
curl -LO https://github.com/vmware-tanzu/velero/releases/download/v1.13.2/velero-v1.13.2-linux-amd64.tar.gz
tar -xvf velero-v1.13.2-linux-amd64.tar.gz
sudo mv velero-v1.13.2-linux-amd64/velero /usr/local/bin/
Install Velero:
velero install \
  --provider aws \
  --plugins velero/velero-plugin-for-aws \
  --bucket k8s-backups \
  --backup-location-config region=minio,s3ForcePathStyle=true,s3Url=http://minio.minio.svc:9000 \
  --secret-file ./credentials-velero
Step 3.5: Velero Credentials (Don’t Skip This)
Create the credentials file:
[default]
aws_access_key_id=minio
aws_secret_access_key=minio123
Create the Kubernetes secret:
kubectl create secret generic cloud-credentials \
  --namespace velero \
  --from-file cloud=credentials-velero
⚠️ In production, use Vault or SealedSecrets instead of plain files.
Step 4: Deploy a Sample Application (With PVC)
kubectl create ns prod

kubectl apply -n prod -f https://raw.githubusercontent.com/kubernetes/website/main/content/en/examples/application/mysql/mysql-pv.yaml
kubectl apply -n prod -f https://raw.githubusercontent.com/kubernetes/website/main/content/en/examples/application/mysql/mysql-deployment.yaml
Step 5: Take a Backup (This Is the Moment of Truth)
velero backup create prod-backup --include-namespaces prod
Verify the backup:
velero backup describe prod-backup --details
If PVC snapshots are missing here, your DR setup is incomplete.
Step 6: Simulate a Disaster (Intentionally)
kubectl delete ns prod
Yes, it feels scary — but this is how real confidence is built.
Step 7: Restore on the Same Cluster (L3 DR)
velero restore create --from-backup prod-backup
Step 8: Restore on Another Cluster (L4 DR)
kubectl config use-context cluster-b
velero restore create --from-backup prod-backup
If the application comes up here, your DR foundation is solid.
Disaster Recovery Testing (Most Teams Skip This)
A backup that has never been restored is not a real backup.
At least once a month:
kubectl delete ns prod
velero restore create --from-backup latest
Common Mistakes I’ve Personally Seen
- PVC snapshots not enabled
- Backups taken but restores never tested
- Single-region object storage
- Blind trust in the cloud provider
📌 Final Thoughts (From Experience)
During an incident, you don’t have time to read documentation.
You only rely on what:
- Has been tested before
- Is clearly documented
- Can be executed without panic
If you follow this guide and run at least one real restore test, you’ll already be ahead of most teams.
Happy shipping — and safe recoveries 🚀